• You are currently viewing our boards as a guest which gives you limited access to view most discussions and access our other features. By joining our free community you will see less advertisements, have access to post topics, communicate privately with other members (PM), respond to polls, upload content and access many other special features. Registration is fast, simple and absolutely free so please, join our community today!

    If you have any problems with the registration process or your account login, please contact us.

Spark plug write up?

Buellxb Forum

Help Support Buellxb Forum:

dave_xb12r

Well-known member
Joined
May 19, 2008
Messages
6,470
I thought I remember seeing a write up on how to change the rear spark plug easily. StevenC wasn't it you?

I recall there are certain lengths of extensions needed and an order of assembly required.

Gosh we need a PM feature

Thanks!
 
The 1st time I changed plugs I followed the service manual taking them out (removing outer & inner air boxes off) and it sucked! I now do them as described below and takes 15 mins.

1) Take off seat, outer airbox cover, and left side air scoop.

2) Pull boot off front cyclinder plug and use 5/8" spark plug socket & 5/8" combo wrench to switch out plugs.

3) Pull boot off rear cylinder with long needlenose pliers. Use 5/8" spark plug socket - swivel connector - 6" in. extension - and Ratchet.

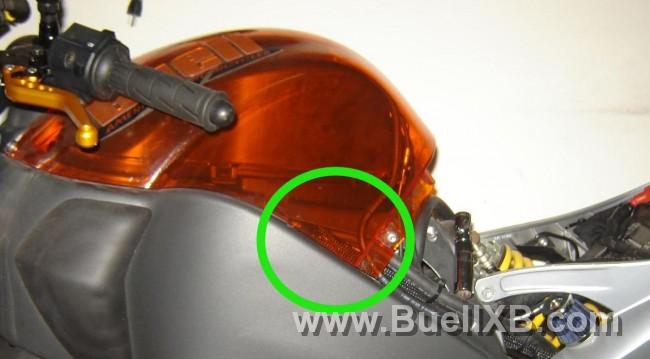
4) Stick all this through the space circled in the picture. (I was too lazy to take the outer airbox off for the pic.) It basically gives you "direct" access to the rear spark plug. Use your left hand to go in behind the frame where the air scoop was, and guide the socket onto the plug and remove.


2339_20090107184732_L.jpg


5) Put the new spark plug in using the same method or a length of 3/8" fuel line, using the left hand through the air scoop space to guide. Be sure not to cross-thread.
 
StevenC, what would I do without guys like you. The guy at the Harley dealer by me told me I had to drop the engine, I almost lost it over the phone... "Eric Buell is not that dumb, I think you have your facts screwed up...CLICK"

Thanks Steve,


Ben
 
Buy the service manual, worth it's weight in gold, outlines procedure in detail,
dealer told me they drop the motor as well, not necessary!! To add to above, need spark plug wire/boot puller , about 1' length of 3/8" fuel hose to thread plug back in - a whole lot easier and less floppy that wobble plug socket on a 10" extension, less chance of cross-threading.
I also coat the top end of the plug with dielectric grease - easier to remove rubber boot in future, and of course never seize on threads.
Front plug requires a 5/8" box end wrench to remove and a crow foot adapter on your torque wrench to tighten-put the crow foot at a 90 deg. angle on the wrench to get true indicated torque , easier than doing math to reduce setting on wrench.
 
Oh, do take the airbox cover off, only 4 - T27 torx screws, prescribed torque is 12 - 36 in/lbs. or 8.5-25 in/lbs wet torque with blue loctite, latter is a must in my book, already lost one screw on the ride home from the dealer when I bought it!!@#%*?#@!
 
Buy the service manual, worth it's weight in gold, outlines procedure in detail
Why buy when it's a free Download at the top of every page?

Edit: And as I said above, the procedure in the manual sucks.....hence the write-up. ;)
 
Stevenc150 said:
Why buy when it's a free Download at the top of every page?
I really like hard copies that are mobile! I don't have a laptop to carry around for a pdf nor a printer to print off pages (my loss though)..
I usually only use the pdf when trying to help members here with tech. questions. Otherwise yeah.. If you can afford to buy a manual it is def. worth it's weight in gold!

:D
 
im about to change the plus this way....what's the deal with needing some extra hose to tread the read plug...doen't make sense to me.
 
Some stick the terminal end of the spark plug in a piece of 3/8" fuel line and use that to start the plug back in where the rear cylinder is at an odd angle.

Never used it myself. I just use the same wobble-joint/Spark plug socket I used to take it out, to put it back in since the socket holds the plug and your left hand guides it behind the frame.
 
you mean a hose to fit on to the plug so you can start to thread the spark plug by hand so that you dont accidently cross thread the plug into the head. if just use the socket and extention you cant feel if it cross threading or not but with the hose if it starts to cross thread the plug stops turning and the only the hose will turn on the plug itself , then once in all the way back off a just a little to check it then tighten by hand with the hose then torque to proper specs with socket and the extention. use a hose like fuel line rubber hose or something like that..
 
The hose does help to start the threads on the rear plug...plus you can 'feel' whether it is going in correctly or not. Use some anti-sieze...besides the obvious reason, it acts as a lubricant and helps to not cross thread the plugs.

Kevin
 
thanks guys..not much of a monkey wrench and am doing this + hose re-route (crankcase). pretty freaky for me to be taking apart the bike on my own, but i think i'll be fine...
 
i agree steven ,but sometimes it can be easier to feel with the hose. ... I've told people to do it like that( socket and extention only) and they end up forgeting to do it without the rachet and they crossthread , 9 out 10 times. because most people especially if they are not Mechanically inclined or never done anything like it they try to take short cuts or go to fast and forget something and screw something up ..not that he was going to do that , but some have, that i have seen.
oh dont forget the antisieze on the threads...
 
Back
Top