Damper rod range of motion....

Buellxb Forum

Help Support Buellxb Forum:

midway

Well-known member
Joined
Jan 5, 2016
Messages
363
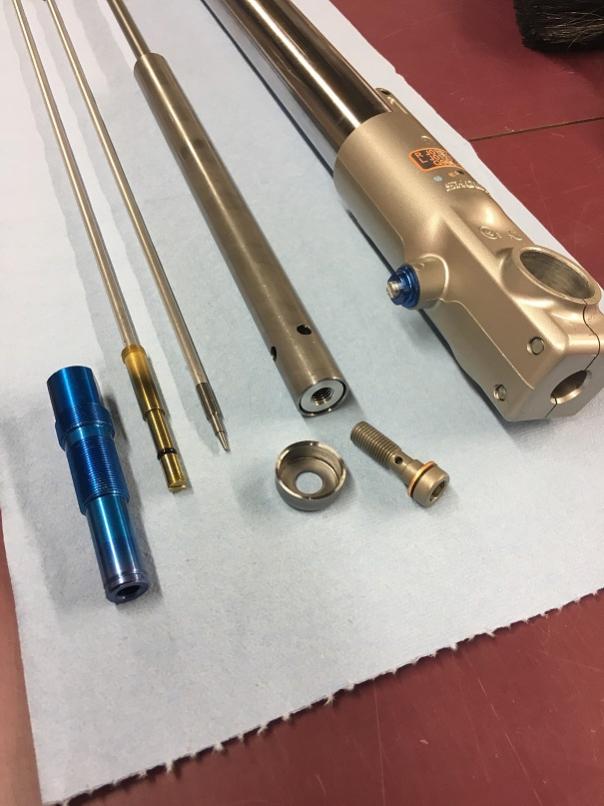
I need to properly adjust the damper rod as some ne'er-do-well service tech or previous owner put the full range of adjustment out when last reassembled. This is the area you skip in the service manual if the damper lock nut as never been tampered with... well it's been tampered with. So I get to go all the way down this rabbit hole and thought I would share some things I see and learn along the way. Keep an eye on me please, I don't want to screw this up. New seals will also be installed.

Tearing down the forks is a snap, we can all do that per the SM. Removing the center bolt from the bottom of the fork slider lets the whole rebound assembly slide out (something you don't need to do if only replacing seals) However sludge is found on the lower end of the damper rod assembly. You'll never see it if you don't go all the way... see image.

Not real happy with how the SM describes making the actual (damper range of motion adjustment) but perhaps it will be obvious.
SM reads like this;

Damper Rod Assembly

1. Fully thread the damper rod lock nut onto damper rod clockwise until it lightly bottoms.

2. Adjust rebound assembly for proper range of motion.

a. Lightly turn the rebound adjuster screw on top of the
rebound adjuster assembly counterclockwise until it stops.

b. Turn the rebound adjuster screw three full turns
clockwise.

3. Fully thread rebound adjuster assembly onto the
damper rod assembly until it lightly bottoms. Do not
tighten.

4. Thread the damper lock nut until bottoms lightly on
the rebound adjuster assembly. Do not tighten.

5. Turning the rebound adjuster screw counterclockwise
three full turns or until stops.

6. Tighten the damper lock nut to 22-30 ft-lbs (30-40 Nm).

7. Repeat for other fork assembly exactly the same.

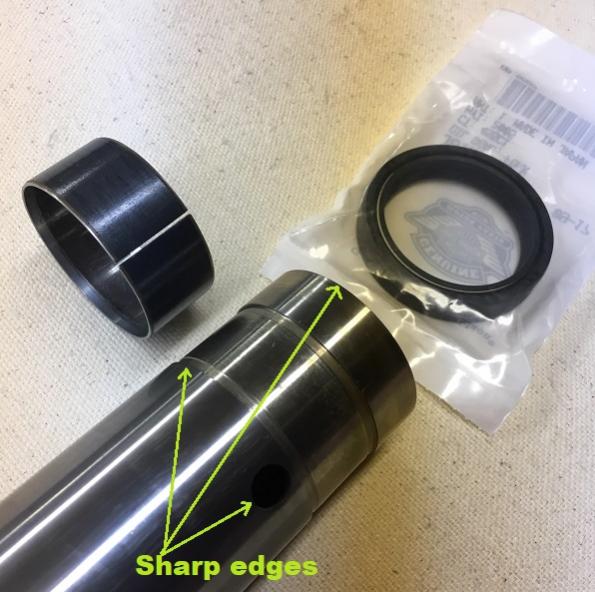
At this point in the thread everything will be flushed out, cleaned and inspected as I'm waiting on a 43mm fork seal driver. I won't be using the bullet tool as you guys seem to prefer seran wrap to slip new seals over the sharp edges.
 

Attachments

  • damper rod.jpg
    damper rod.jpg
    73.5 KB
  • damper assembly.jpg
    damper assembly.jpg
    55.5 KB
It's quite simple when you go to put it all back together. The lock nut gets threaded all the way down so that the needle valve shaft (that shaft with the tapered tip) can bottom out, then you run the lock nut back up making sure the tapered shaft is still fully seated, this sets the end of the range so make sure the adjustment knob is set to the same end of its adjustment. Problem with only doing the one leg is if the other one was not set up exactly the same you will never be able to have the same dampening settings between the two, causing unsafe riding, tire wear, etc... best just to do them both so you know for sure oil is the same weight/type and set to the same height (coat hanger makes a great dip stick) and that both have been bottomed out with the external adjuster set the same.

I've run into less than great service on my STT fork as well and found all the same stuff going on that you have so this is why I say to do them both at the same time and make sure they are right. The STT fork has the external adjustment as part of the top fork cap with damper rod (needle valve shaft) attached, so this is my experience but the setting you ask about when rebuilding is the same.
 
Step #2 is simply describing what you are doing in step 2a and 2b.

The rebound adjustment screw should be 3 turns in from max out, screw the assembly on the rod to lightly seat it and thats where you tighten the locknut. The rest is the manual telling you to back off the adjustment before you tighten it, so you don't inadvertently crank on it and over tighten the needle in the seat. Yes, do it that way.

And lowkey, is right. Always do both legs at the same time. Seems like you have the rest handled, but no need to wait for the driver when a bit of PVC tube will work fo a buck or so :eagerness: Just make sure the id of the PVC doesn't hit the lip of the seal. It doesn't take much to seat them properly. Saran wrap is a step missed by most people until the new seal you just put on leaks! Then you never miss that step again,:black_eyed:
 
Last edited:
Thanks for the confidence!

Ah I'm reading 2a & b subsections correctly now. I WILL do both forks at the same time, makes sense. The seal driver will be here on tuesday so using the time to clean all parts and study the mechanics. I will say this tool made quick work of the spring compression. A coat hanger for oil level check seems practical, probably didn't need a kit.

I noticed this piece of the (preload adjustment assembly) is not recognized by my hard copy service manual in the exploded view or numerical listing. But it is shown in the parts manual. Makes me wonder what else was forgotten in my SM's version detail.
 

Attachments

  • tools.jpg
    tools.jpg
    48.9 KB
  • widget.jpg
    widget.jpg
    48 KB
  • IMG-0994.jpg
    IMG-0994.jpg
    47.4 KB
Last edited:
I set my dial indicator to the right measurement and use the tail of it. The syringe is still faster:cool:

Thats a heck of a nice spring compressor! Put your initial on it or Ol' Coot's coming by to borrow it! LOL
 
Nice fancy tools Midway! Cooter please describe the saran wrap procedure in detail, I can't picture it in use. Is it used over the slider bushings on the stanchions when sliding into the seals?
 
A little lube all over everything and then wrap it over the tip of the hard tube (just the tip). You don't want your big tube to cut the virgin seal lips when you spread them over the shaft.:eek: Then you can yank off the protection and raw dog it all the way down the hard shaft until you hit the bottom. Bam!


Jokes aside, it's just to protect the seal from the end of the threads so no twisting. Threads are sharp!
 
to protect the seal from the end of the threads so no twisting.
You didn't mean to say threads did you Cooter? My understanding of the saran wrap trick is to easily slide a new seal down over these sharp edges specifically the one very sharp edge where this bushing snaps on to the fork piston AFTER the seal has been installed.

Without pictures my mind went here when reading about the use of seran wrap. Help me out if I'm wrong please.
 

Attachments

  • seal.jpg
    seal.jpg
    53.7 KB
Last edited:
Midway, I think you have it exactly right on where this would be used (and a nice safeguard for the seal), this is the only part of a rebuild where I can remember them possibly getting damaged. I used special o-ring grease without the bushing on the stanchion, once the seal was past that recess I installed the bushing on the stanchion. When seating the seals into the fork tube, o-ring grease or fresh fork oil will help the process. Looks like you went with OEM seals if that is a picture of your fork. I went with All-Balls which have a double lip seal, very good choice if you have to do the forks again in the future.
 
Dude, you are waaaay out-thinking this. Yes. Any sharp edges. You just don't want to cut the lip on the seal, that's it, nothing special, total common sense.

It puts the plastic wrap over the end of the tube
it installs the lubed dust seal
it installs the spring clip
it installs lubed seal (inner spring towards oil/ up)
it removes the plastic wrap
it put's on the slider bushing.

Then you can continue assembly. The manual is really very clear and precise about this.

I have only ever installed OE or AllBalls seals and never had one fail prematurely on any bike. Good brand IMO.
 
Cooter I think we clearly understand, it was the first time I've seen it mentioned and a good tip for sure.:up: I outlined where I thought it would help and was right, but just as easily could have missed it. I probably have the worst memory out of every forum member here so if I don't constantly do a procedure I quickly forget. I make a point to document stuff and put it in digital folders to look back on to jog the brain.

Midway, you will be fine with the seals you've already bought. I just wanted to give feedback on the All-Balls alternative seals, as they so far have worked out very well for me.
 
lowkey, your on it bro. Always good advise from you:up:

I hear ya in the memory department:upset: old sucks, and I'm too lazy to document stuff like you do....

and this delicious beer doesn't help either! :sorrow:
 
Double checking the reassembly tonight I find extra parts not shown in the service manual oO
Someone had installed spacers, no wonder I was always trying to soften up the front end.
I won't be putting these rubber 5/16" spacers back in. I'm not even sure where they go... but this is where they fit (1st image).

Are these used to stiffen up the springs? I don't weigh enough to need a stiffer ride so no modification for me please.

I perfectly calibrated the range of motion for the damper assemble. Seran wrap worked like a charm for the OEM seals. I'm all set for a much more comfortable ride. Here's some picks to finish the thread. If anyone knows what the benefits of modding the suspension with these spacers was for I would like to hear it.

This is the last of the ne'er-do-well surprizes on my Buell, nothing left to do but keep it upright this summer.... lets ride!
 

Attachments

  • lifts.jpg
    lifts.jpg
    70 KB
  • spacers.jpg
    spacers.jpg
    70.5 KB
  • seals.jpg
    seals.jpg
    66.6 KB
  • showa.jpg
    showa.jpg
    55.6 KB
  • showa1.jpg
    showa1.jpg
    43.8 KB
Last edited:
Tossing in my sleep until you guys I.D. these extra parts. I clearly don't see or read about them in the SM... any thoughts?
 

Attachments

  • expanded.jpg
    expanded.jpg
    60.7 KB
  • showa2.jpg
    showa2.jpg
    50.5 KB
  • spacers.jpg
    spacers.jpg
    70.5 KB
Last edited:
I don't know what they are. Haven't seen them in fork that I can recall? Where they are, they would act like some kind of compression bump stop? Is it supposed to go between the preload adjuster and the spring? That would obviously raise the height a little and the 'stiffness'/pre-load as well.

Throw them in the junk drawer and go riding.:up:

What weight fork oil are you going to use?
 
Where they are, they would act like some kind of compression bump stop? Is it supposed to go between the preload adjuster and the spring? That would obviously raise the height a little and the 'stiffness'/pre-load as well.
I failed to take pictures during tear down so I'm left to wear mark clues as to their installation position. I'm certain now they are shown correctly in these images. There is a slight impression on one side of these very hard rubber spacers placing them as shown in this explode view I've revised.
 

Attachments

  • spacer3.jpg
    spacer3.jpg
    20.9 KB
  • spacer.jpg
    spacer.jpg
    54.8 KB
  • oil.jpg
    oil.jpg
    54.3 KB
If it the spring doesn't sit on it to change it's seated height, then it would act as a compression bump stop. Is this bike an Scg?

What is your total riding weight? (Geared up), and where were the settings set on the forks (at the most comfortable to you) before the tear down?

Unless someone can pipe in here that they've seen it before?
 
If it the spring doesn't sit on it to change it's seated height, then it would act as a compression bump stop. Is this bike an Scg?

What is your total riding weight? (Geared up), and where were the settings set on the forks (at the most comfortable to you) before the tear down?

2006 firebolt XB9R, 190 lbs. The reason I tore down was the inability to make the SM's rebound adjustment according to the weight chart. Whomever was in here limited the rebound range of motion either intentional or unwittingly. Given the added spacers I now think it could be either one.

Rebound range of motion has been restored to factory settings and i'm trying to find the confidence to discard the spaces but if they ARE factory and the SM is wrong (not the first error we've seen in this thread from my service manual)... well you can imagine my concern.

btw this is a quality weighted tool that if it works as good as it looks and feels is worth the money.
 

Attachments

  • driver.jpg
    driver.jpg
    41.1 KB
Last edited:
Those rubber parts have not been in any XB forks I’ve taken apart. BUt I haven’t had R forks apart before.

I ask about the settings and fork oil because you said it was too stiff no matter what the settings. At your geared up weight, and suspension preferences, 10W fork oil might be to thick.
 
Back
Top