• You are currently viewing our boards as a guest which gives you limited access to view most discussions and access our other features. By joining our free community you will see less advertisements, have access to post topics, communicate privately with other members (PM), respond to polls, upload content and access many other special features. Registration is fast, simple and absolutely free so please, join our community today!

    If you have any problems with the registration process or your account login, please contact us.

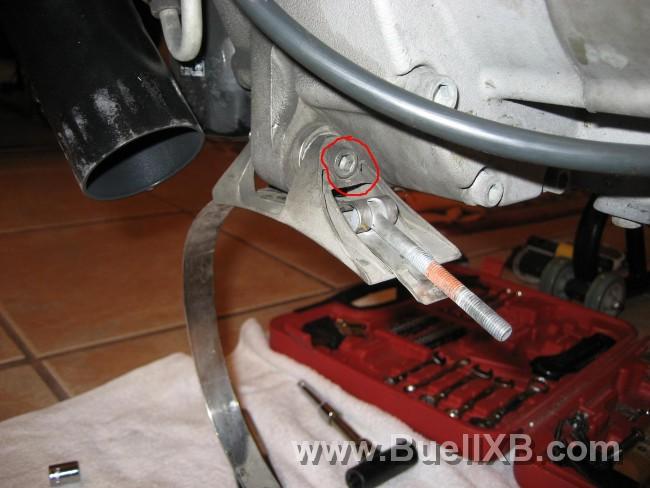
Front exhaust mount bolt

Buellxb Forum

Help Support Buellxb Forum:

wally

Well-known member
Joined
Mar 31, 2011
Messages
632
Location
Bellville, South Africa
This thing is driving me nuts!!! [mad][mad][mad]

I have now replaced my 3rd bolt in there and they are all gone!

After getting the headers coated and installed last year I noticed the front moutning bolt missing.

No problem, got high tensile bolt with lock nut.
2 days later - no bolt or nut!

Got another bolt, but 2 regular nuts (figured maybe heat caused nylon lock nut not to lock).
Double locked the nuts with locktite.

Last week - gone!

Got another bolt, with lock nut, used drillpress to drill small hole at end of where nut sits.
Installed with locktite and inserted split pin, thinking no ways are you undoing again!

Noticed more rattling noises since yesterday.

Checked this morning at work and the f@#cking bolt is gone!
Now it gets better: nut side is gone, checked the other side and bolt head is still there!
So I reckon the other bolts must have sheared off as well!?

Am I using an incorrect spec bolt? What should I be having in there?
 
Are you talking about the front muffler mount? If so there should be 2 aluminum bushings (spacers) on the inside of the mount that the bolt goes through. Check and see if they are there.
 
Those bushings do wear out. Have you checked your front isolator and also your rear isolator (not as common but does wear out). Also Inspect the y-bracket and the mounting points, along with the tierods: one that goes from the top of the rear cylinder to the frame (it's under the seat) and the other goes from the front of the engine to the y-bracket. That is what keeps your engine located and absorbs vibration. If you have heavy vibrations, there must be an underlying problem. Also inspect the rear exhaust mount and all the bands that secure the muffler.
 
as joel and melvster mentioned you are referring to the large cast aluminum front muffler mount that holds the front of muffler to cast-in mount on front of motor.....correct? you're not doing something correct during assembly wally as it's extremely rare for that mount to come loose. what i do is have bike on sidestand....some towels and wood blocks....have rear mount tight and front mount loose...install muffler and wiggle around till it is seated in both mounts...then install worm clamps and start to tighten them. be SURE to have muffler to headpipe clamp slid up on headpipe or you'll be cursing yourself. continue to tighten the worm clamps and the front mount bolt. what you want is perfectly vertically straight mounts and a correctly seated muffler to those clamps. when all is snug then i tighten the front mount bolt using blue loctite on threads. the bolt only goes in one way as the nut becomes captive in the clamp fixture. if you do it this way nothing will ever come loose or fall off.
 
I checked Melvster's recommendation and all connections are secure.

Got a lower grade high tensile bolt from engineer supply shop to see if that will help.
Had grade 12 (from hardware store) now grade 8 (from engineering shop).

Yip, fringe, the part that secures in the cast mount:
4943_20110131141233_L.jpg

(thanx to wiznut's pic) :D

I must have gotten the bike without it in, cause I never noticed it until I had the headers of to get them ceramic coated. By now I have "lost" 3 bolts already. The last one on Friday was snapped off.

I will follow your step and reinstall the whole thing over the weekend. [up]

Only thing I can think is that a) bolt was too hard and b) I need proper HD bolt, as maybe the generic bolts don't tighten enough?
 
That's it! I have had it! Going to get the proper bolt from HD (even if it is 20 times the price). [mad]

Another one gone! Going the whole route of undoing the exhaust and reinstalling step-by-step.

Found the sheared of head of the previous one in the parking space at work:
9521_20140120233051_L.jpg
 
I lost mine last sumer, I noticed it because one of the studs that hold the header flange broke and then I kept losing header flange nuts, until someone told me to check the front exhaust mount bolt and sure enough it was gone. I just replaced mine with the one socket head cap bolt I could find at sears hardware that fit, haven't had any trouble out of it since. I agree with John(lunaticfr...) on the assembly procedure, should solve your issues.
 
I have a quick question regarding the muffler to header clamp:

Once tightened, is the muffler still supposed to have play on it?
In other words, should the clamp hold the muffler solidly in place without any movement?

My clamp is tightened to its max, but the muffler still has vertical movement.

Could this be causing stress on the mounting?

Thanx!
 
Here are the steps from the manual:
On the front muffler mount fastener, torque is applied to
the head and not to the nut.
4. Tighten front strap fastener and alternately tighten rear
muffler strap fasteners evenly till fasteners are tightened
to:
a. Front: Tighten around the muffler until snug.
b. Rear: 48-60 in-lbs (5-7 Nm).
c. Front muffler mount: 16-18 ft-lbs (21.7-24.4 Nm).
d. Front: 108-120 in-lbs (12-14 Nm). Back off fastener
two full turns and then retighten to 108-120 in-lbs
(12-14 Nm).
5. See Figure 2-115. Tighten the Torca clamp (1) to 28-
30 ft-lbs (38-40.6 Nm).
6. Tighten the front muffler mount to 16-18 ft-lbs (20.3-24.4
Nm).

In addition, I used a longer bolt for the front mount, and put an additional nut on, just tight enough to hold it like a lock nut. I jump over curbs, run down fireroads (mostly slowly), and haven't had a problem. Apparently, you are somehow putting undue stress on that bolt, probably because it has not freedom by being installed too tightly. If you have doubts about the actual bushing parts, you could order new ones from ASB. Cheers.
 
Thanx, I followed it, sort of closely.

I wanted to see if I could get spacers made up locally.
When bolt tightened there is quite bit of play on the 2 spacers.

Is this correct or should they be fitting tight?
 
I do not think they should fit too tight, as they are more like bushings, rather than just a spacer.
 
I tried to snap 2 quick pics this morning.

Looks grungy, but it is not that bad!

On the right side of bike the spacer sits deeper:
9521_20140130002718_L.jpg


than on the left:
9521_20140130002828_L.jpg


I also noticed quite a bit of space between the left side spacer and the actual mounting bracket.

Is this all OK?

Need to know, cause I ordered new ones through HD yesterday and if it is, I can maybe still cancel it if it isn't needed.

Thanx guys!
 
Have some potentially good news so far.

After having lost countless high tensile bolts, I took a chance with a normal stainless bolt and lock nut.
Surprise! It is still holding up - for the last 3 days at least...:D

My mind said high tensile makes sense, apparently I was wrong... :p
 
The harder the bolt, the more brittle it acually is. Sometimes a softer stronger bolt is better than a super hard bolt.
Glad you are making some progress with your issue.
 
Spoke too soon...

Heard the (by now) familiar sound of the chin fairing bracket vibrating a bit more than it did this morning.
And indeed - the nut end is sheared off again! [mad]

Plus, I followed instructions, torqued everything properly...

Waiting to see if the correct "Buell" bolt and nut will do the trick.

Also ordered new spacers.
 
Back
Top