2003 XB9S Multiple Problems

Buellxb Forum

Help Support Buellxb Forum:

I went to Harbor Freight and purchased their Master Fuel Injection Pressure Test Kit (Pittsburgh Automotive - Item# 97706). For my bike I had to use the number 28 fitting, which fit PERFECTLY between the fuel line and the throttle body.


Whilst having the 2006 XB9SX ECM in, I tested the fuel pressure of the bike with the key switch ON and the kill switch set to RUN in order to have the bike prime. The needle on the gauge didn't move.

I tested the fuel pressure of the bike while trying to crank, and had the same result. The needle on the gauge didn't move.

I repeated these tests with the 2003 XB9S ECM and had the exact same results.


For both ECMs I went through the service manual flowchart meant for NO fuel pressure on page 4-35. For both, I found:

1) Voltage IS present at the GY wire Terminal D on fuel pump connector [86A].

2) Test lamp DOES come on during first two seconds after key ON when test lamp is placed on positive (+) terminal of battery and when BN/Y wire of [86A] is probed.

3) Fuel pump wiring IS good.

Diagnosis: Replace fuel pump assembly.


I didn't replace the fuel pressure regulator when I replaced everything else. I'm thinking I should have just as a precaution. Hindsight is 20/20.

I checked the line from the fuel pump and there are no kinks, cracks, or visible problems. I didn't have a chance to take the line off to see if the pump would deliver gas.
 
*UPDATE*

I pulled off the fuel line from the pump and hooked up the fuel pressure gauge to see if the pump assembly was pushing anything out. To my surprise, it WAS putting out a bit of fuel; however, the amount of fuel that’s being pushed out isn’t even enough to move the needle of the gauge.

While looking up part numbers for a fuel pressure regulator (62121-99Y) I came across a thread concerning fuel pump cross-references. I noticed some different part numbers being tossed around for the actual fuel pump and decided to look into it.

Some of the part numbers that came up were for the Airtex E2366, which is in the current fuel pump assembly, but then there’s the Airtex E2061.


Airtex E2366
Rockauto Price – $80.79
UPC – 080044011071
Type – Turbine
Volts – 12
Pressure – 100-120
Flow (GPH) – 65-75
Inlet Type – Strainer
Outlet Size – 3/8”
Outlet Type – Hose Barb

Airtex E2061
Rockauto Price – $64.79
UPC – 080044102663
Type – Gerotor
Volts – 12
Pressure – 80-90
Flow (GPH) – 40-50
Inlet Type – Strainer
Outlet Size – 5/16”
Outlet Type – Hose Barb


I have ordered a fuel pump (crossing my fingers), fuel pressure regulator, fuel pump screen, and new o-rings. Currently, the bike is sitting on a stand with the fuel pump removed awaiting the new parts, which should all be here by the end of this week.

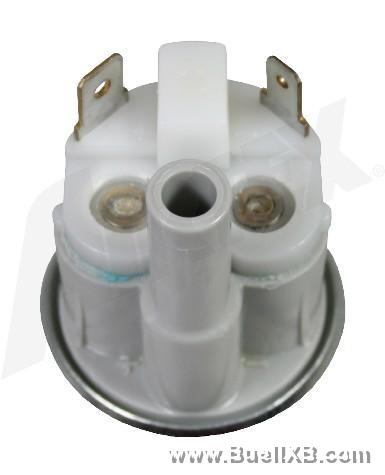
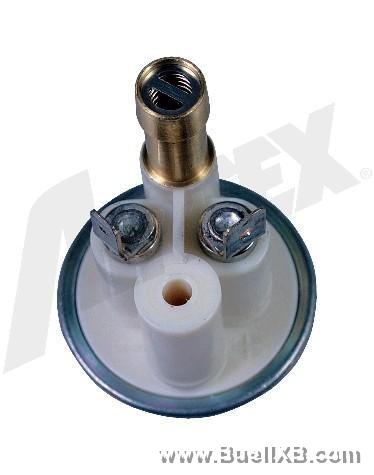
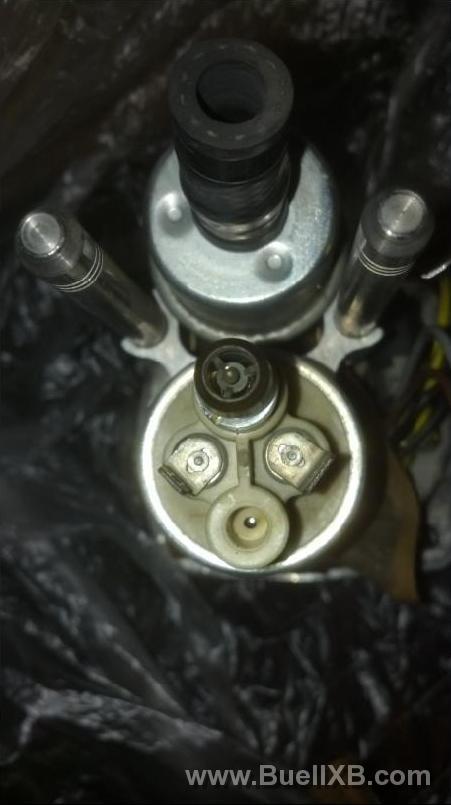
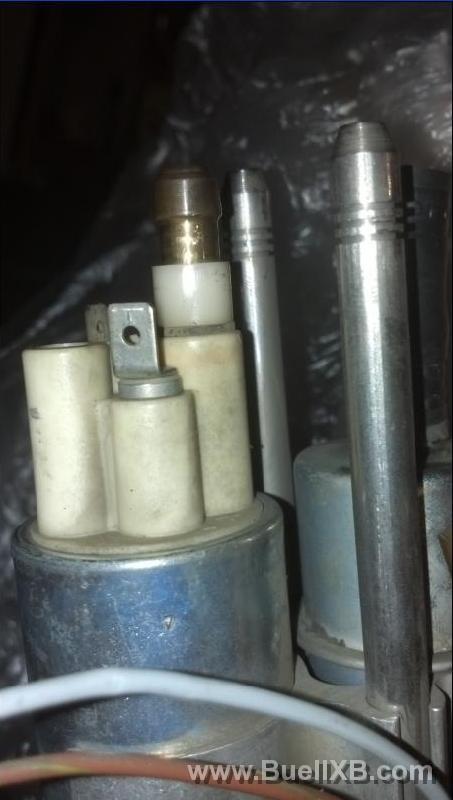
Attached are a few pictures to show the differences between the Airtex E2366, E2061, and the original fuel pump of the 2003 XB9S.

Airtex E2366
17481_20130922205654_L.jpg


Airtex E2061
17481_20130922205726_L.jpg


2003 XB9S Fuel Pump (Above)
17481_20130922205809_L.jpg


2003 XB9S Fuel Pump (Side)
17481_20130922205832_L.jpg
 
*UPDATE*

The new fuel pump (Airtex E2061) came in and is a PERFECT fit. I paired it with a different fuel strainer (Airtex FS111) than the stock one.

Took the bike apart, removed fuel pump assembly, put together E2061 and FS111, and shoved the assembly back up into the tank. I primed the bike and found out the pump works VERY well by having gas spray from where the fuel hose connects to the fuel pump. I checked the line and found nothing was wrong. I checked the hose connection and felt it was somewhat loose. Naturally, I felt I should tighten the nut on the fuel pump. The nut felt it should break off the fuel pump connection.

After exchanging some “choice” words with the fuel pump I decided to remove the fuel pump assembly….again. Luckily, I still had old fuel pump assembly. I pulled the assembly out of the tank, swapped the parts, double-checked everything, went over the fuel hose and the connections, triple-checked everything, and then put it all back together.


Good News: The bike starts and sounds AMAZING

Bad News: The bike won’t idle


With key set to ON and kill switch set to RUN I can keep it running if I’m pulling back on the throttle. As soon as I let off, it dies.

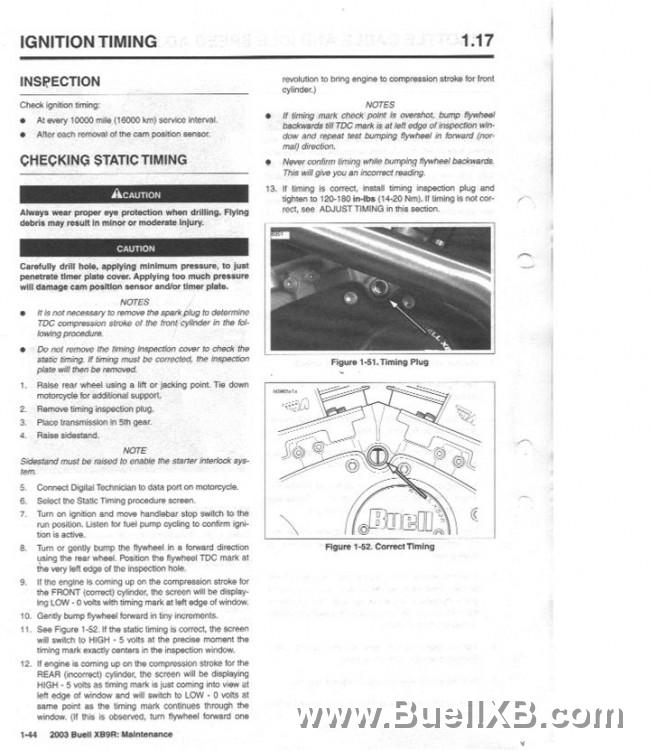
I decided to check ignition timing and found it to be incorrect.

Front Cylinder Compression Stroke
Voltage is at 0 with timing mark on left edge of window
Voltage is at 5 with timing mark beyond (out of view) right edge of window

Rear Cylinder Compression Stroke
Voltage is at 5 with timing mark centered
Voltage is at 0 with timing mark centered/continuing through window

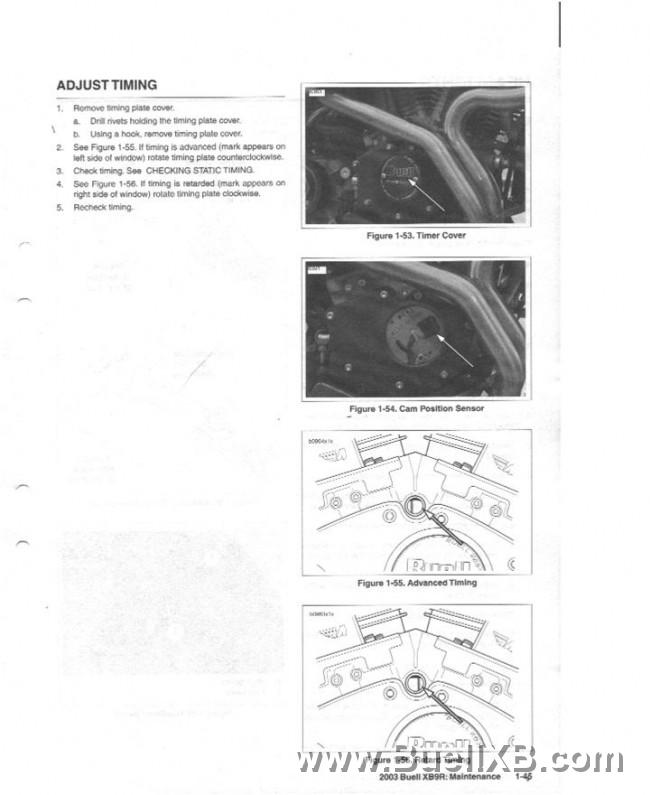
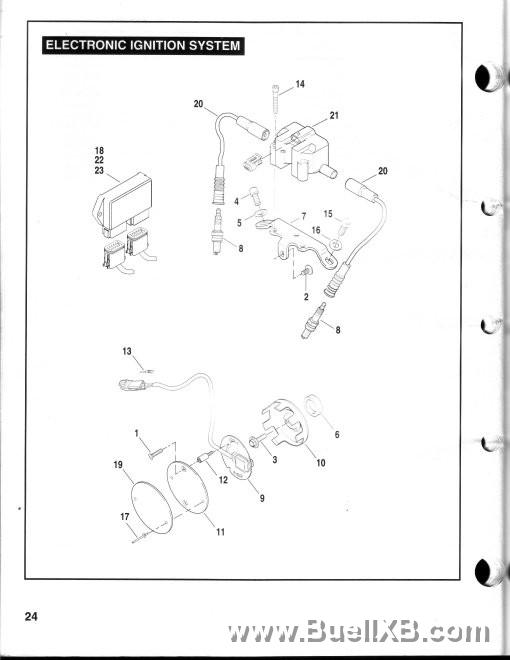
I have attempted to adjust the ignition timing, but I feel I’m doing something wrong. I assumed the timing to be retarded and followed the service manual instructions by turning the timing plate (#9 in the diagram) clockwise. Each time I moved the timing plate I checked the timing, but it didn't feel like improvements were made.

If anyone has any tips or any information on how to set static timing I’m all ears.


But hey, the pump works!

17481_20131001131739_L.jpg

17481_20131001131758_L.jpg

17481_20131001132213_L.jpg
 
*UPDATE*

Forgot to mention I picked up a trouble code for the cam position sensor, which is why I felt I needed to set the timing. I'm 99% certain I was looking at the trouble code history and not the current readings.


After "setting" the cam position sensor I tried to start the bike and thought someone shot at me due to the HUGE pops that came from the exhaust. Afterwards, I did a TPS reset.

I figured there was some extra fuel in the system since I had to play with the cam position sensor for quite a while. When I tried to start it (with earmuffs) I noticed puffs of black smoke and 1/2" flames shooting out from either exhaust end.


This is the order of what I'm thinking needs to happen:
Fudged up CPS and should have left it
--Redo CPS job

See if bike will start
--If bike starts and idles, the forces of nature won't be able to keep me off it

--If no start, see if engine can get warm
----If engine can get warm and idle - Maybe Engine Temperature Sensor is bad
----If engine can get warm and won't idle - We'll see
 
*UPDATE*

I managed to set the CPS and checked the timing a few times before I closed everything back up. Afterwards, I did a TPS reset with ECMSpy, pulled the bike of the battery tender, and put the ignition to on.

The gauges swept normally and the fuel pump primed. I hit the starter and instead of hearing it come to life, it clicked over and over as if the battery was dead. I attempted start it three more times, but each time it sounded like the battery had less and less power in it. I noticed the clock read "1:00," too.

I put the bike back on the tender and let it sit until it had a full charge. I swapped out the 2006 ECM for the 2003 ECM, but had the same results. With the 2006 ECM back in place, I hooked up some jumper cables from my truck and got the bike to start for a short amount of time.

It wouldn't idle, but would stay running for a bit if I cranked back on the throttle. Even when I had the throttle pulled back the RPMs would drop, but come back up after one second to where they were.

While pulling back on the throttle, I saw a small amount of gray smoke coming from where the headers connect to the engine. I couldn't tell if it was coming from under the airbox cover or around the throttle body, just that it was coming from the area by the headers.

I haven't attempted to start it again, and am thinking I need to look over a few things.
 
*UPDATE*

Alright, I pulled the headlight fuse, turned the key over, and the headlight still came on. I tested the high beam and turn signals, and they wouldn't come on. I pulled the two spares along with the headlight fuse, and the headlight still came on.

I attempted to crank it over, but the same thing happened (little attempt to crank, clock went to "1:00," machine gun clicking).

I hooked it up to my truck with the fuses out and it sounded a little better, but still wasn't up to par.

From buellxb (link at the bottom) I read about adding ground cables to the negative terminal in order to help voltage return back to the battery and create a more complete/fluid circuit.

I added 4 gauge wire from the rear bolt that holds down the ignition coil and from the left side of the engine ground. The two wires were routed alongside the fuel line and hooked up directly to the negative terminal of the battery.

Here's the order of wires (closest/touching the negative terminal to furthest/touching the battery bolt head) going to the negative terminal.
1) Rear ignition coil bolt
2) Engine ground
3) Frame ground (wire every bike has)

At this point I did a TPS reset (easier to move the wires around without the ECM plugged in).

After hooking up all the wires and plugging everything back in the start attempt appeared to be, again, a little bit better. I hooked the bike up to my truck, let it sit for 1-2 minutes, and got it to start while cranking back on the throttle.

Last time, when I had the bike hooked up to my truck's battery I noticed the rpms would dip down and then jump back up even if I didn't move the throttle from where I held it (at 3000 rpm). While being hooked up to my truck and having the two ground cables in place the bike stayed at any rpm I chose (2500, 3000, 3500, 4000, 4500) and was STEADY. There were no dips, stalls, or sputters, but there were a few pops and bangs from the exhaust. It even idled for a few seconds! It was a sluggish idle and died shortly after, but it was there.

Some more gray/white smoke came out from under the airbox. It smelled pretty bad and I still couldn't tell where it came from, but there wasn't as much spewing out this time in comparison to last time.

http://www.buellxb.com/Buell-XB-For...ith-an-incurable-sputter-in-the-mid-range./3/
 
I checked my plugs about a week ago and they had some grime on them. A dark/black fluid. I figured they were fouling because of the fuel pump being primed constantly and the bike sitting for an extended period of time. I haven't replaced the plugs since then. I did my best to clean them off and checked the gap before putting them back in.

The smoke bugs me, too. I'm planning on starting it up today without the airbox cover or base to get a better idea of where the smoke is coming from. As far as I know the electrics are fine, but after how things have been with this bike I'm not ruling out anything.
***
They turned out as white as they were in the package. The stuff that was on them came right off.

I wouldn’t remove the oxygen sensor if I were to remove the airbox cover and base. I didn’t get around to seeing where the smoke was coming from; instead I went through the flowcharts for the engine temperature sensor.

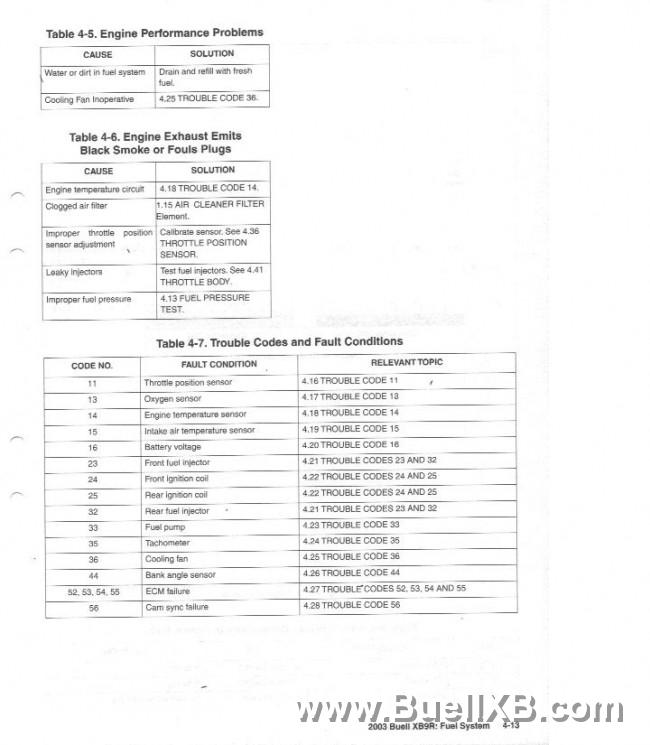
If you look at Table 4-6 entitled, “Engine Exhaust Emits Black Smoke or Fouls Plugs” there are a few different possibilities given:

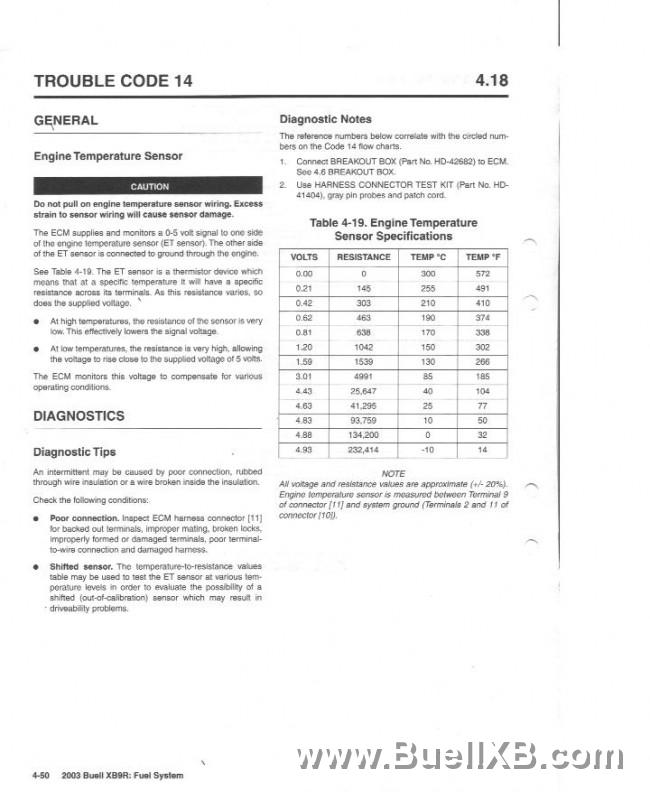
Engine Temperature Circuit
Clogged Air Filter
Improper Throttle Position Sensor Adjustment
Leaky Injectors
Improper Fuel Pressure

I eliminated Clogged Air Filter-isn’t clogged and Improper Throttle Position Sensor Adjustment-checked it and it’s sitting at 5.5 degrees. I didn’t have time to break out the fuel pressure tester or take apart the throttle body, so I didn’t test for fuel pressure or leaky injectors. This leaves the Engine Temperature Circuit.


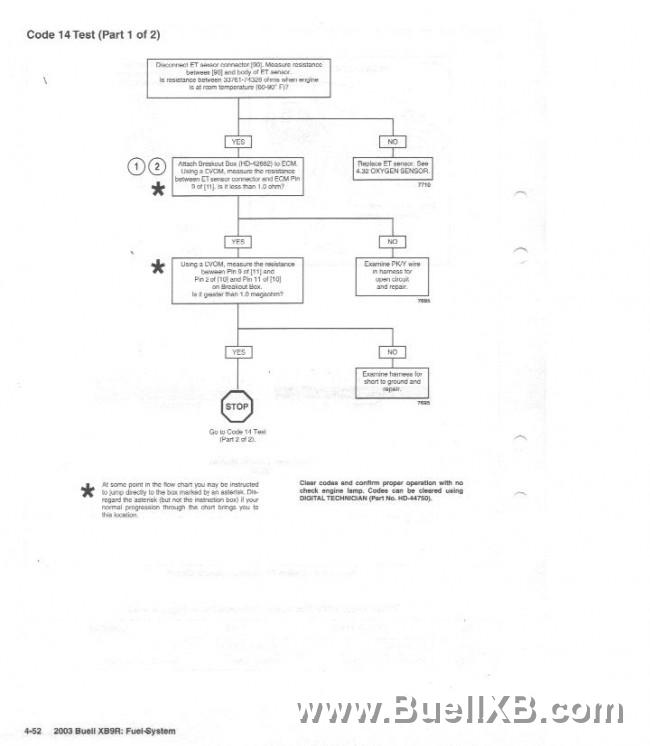
I went through the flowcharts for testing the sensor, but couldn’t test the resistance between the connector [90] and the body of the ETS since I couldn’t get the ETS out, nor could I remove the rubber boot over the ETS. I jumped over the first step and here’s what I found:

Resistance between connector [90] and ECM Pin 9 of [11] is less than 1 ohm
Resistance between Pin 9 of [11] and Pin 2 of [10] and Pin 11 of [10] is less than one megaohm

Solution: Examine harness for short to ground and repair


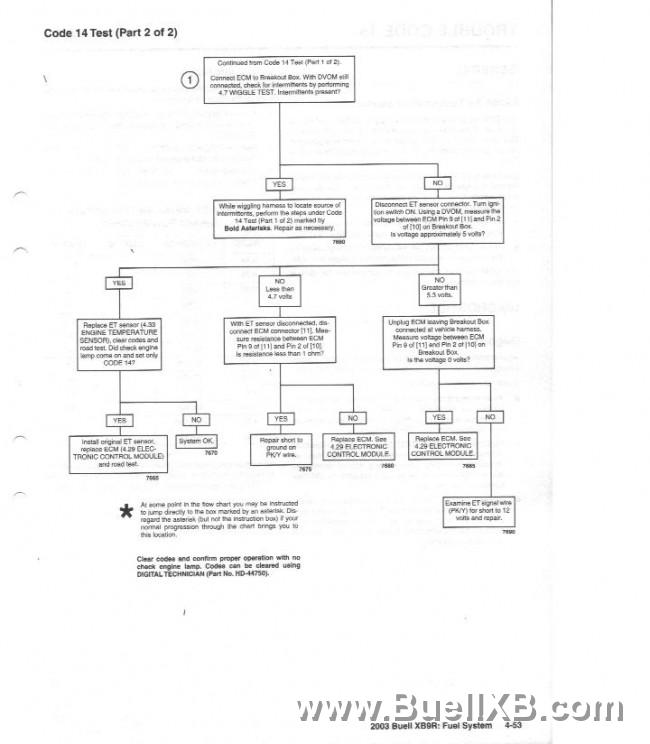
Voltage between ECM Pin 9 of [11] and Pin 2 of [10] was almost nonexistent
Resistance between ECM Pin 9 of [11] and Pin 2 of [20] is less than one ohm

Solution: Examine harness for short to ground on PK/Y wire


Yes, I understand I jumped around the flowchart, but I felt I should test where I could in the moment since I had it open.
17481_20131022163704_L.jpg

17481_20131022163740_L.jpg

17481_20131022163753_L.jpg

17481_20131022163835_L.jpg

17481_20131022163849_L.jpg
 
Just tried to start it with the airbox cover and base off while having the IAT connected. It wouldn't turn over AT ALL. I heard nothing but that (as Froggy put it) "machine gun click".

Before I attempted to turn it over in the upcoming methods, the battery was on a tender and showed a full charge.

Disconnected CHT - clicking
Pulled light fuse - clicking
Hooked up truck battery with CHT disconnected and light fuse out - clicking
Hooked up truck battery with CHT connected and light fuse out - clicking
Hooked up truck battery with CHT connected and light fuse in - clicking

I allowed the battery to be hooked up to my truck battery awhile before attempting to start it again - clicking

I didn't get a chance to see where the smoke was coming from since I couldn't get the engine to turn over
***
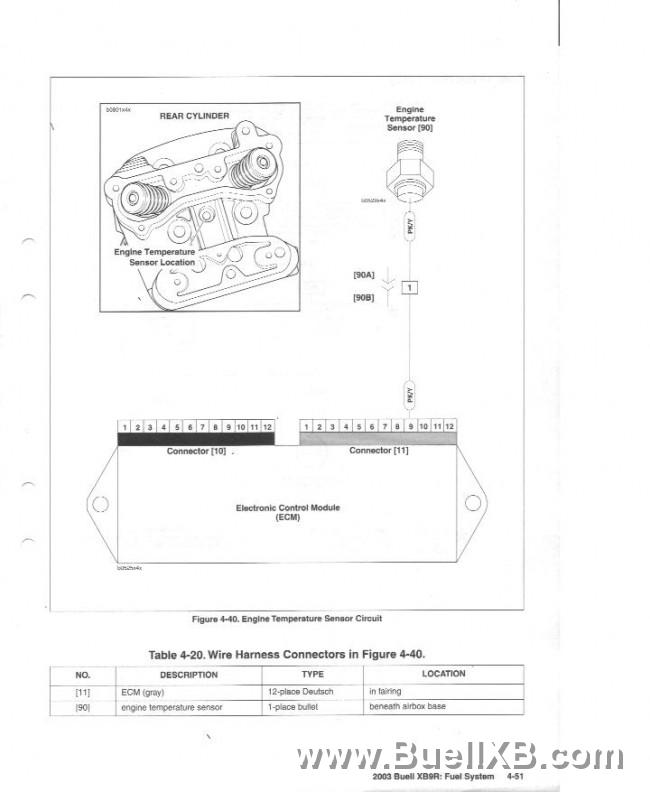
Pin 2 of [10] is system ground A (module)
Pin 11 of [10] is system ground B (coil)
Pin 9 of [11] is a direct connection to engine temperature sensor connector [90]

Resistance between connector [90] and the area surrounding the sensor is 63.6k ohms at room temperature. Good here

Resistance between connector [90] and ECM Pin 9 of [11] is less than 1 ohm. Good here

Resistance between Pin 9 of [11] and Pin 2 of [10] and Pin 11 of [10] is 64.5k ohms (or .0645 megaohms) for Pin 9 to Pin 2, Pin 9 to Pin 11, Pin 2 to Pin 11. ...not good here

Solution: Examine harness for short to ground and repair.

Yes, the clicking noise is from me holding down the start button. The lights dim while the button is being held down and flicker/flash with each click.


Just a thought:
I attached 4 gauge wires from the rear ignition coil mounting bolt and from the left side of the engine ground to the negative terminal of the battery.
-Could the two cables be causing this lowered resistance since Pin 11 of [10] is system ground B (coil)?
-Could the short to ground causing the aforementioned lowered resistance also be the reason for the battery to be drained so quickly?

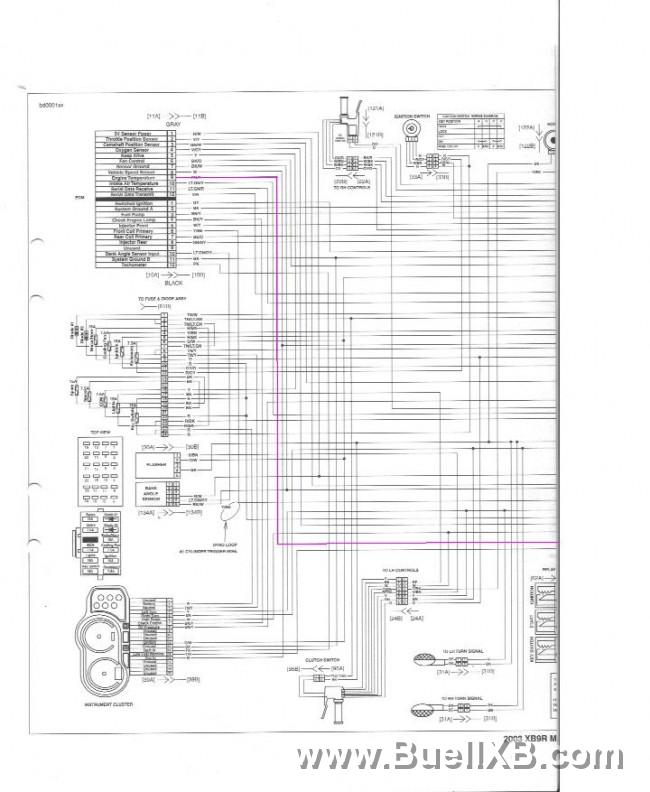
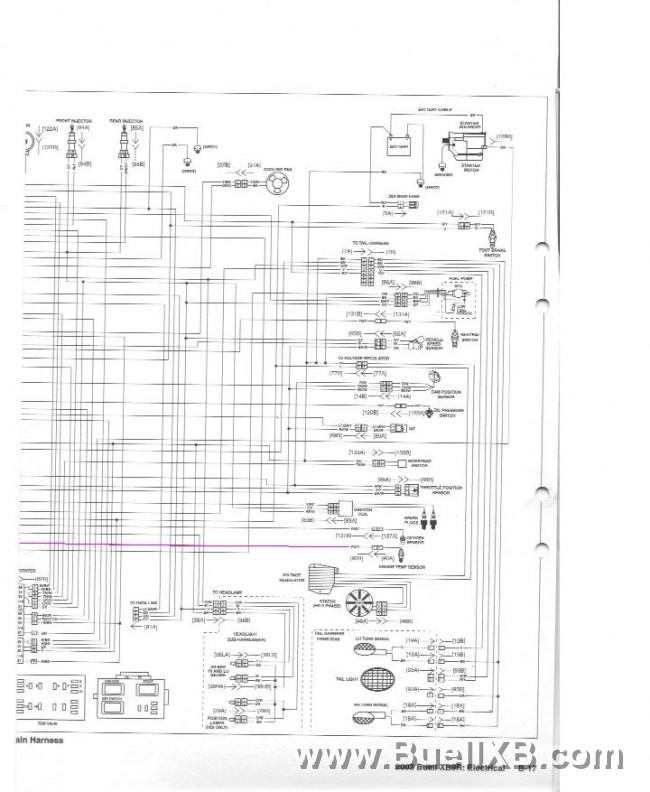
I attached the main wire harness layout and color coded the wire so it stands out more.
17481_20131022164233_L.jpg

17481_20131022164248_L.jpg
 
*UPDATE*

Before I did anything I took a few pictures of the cable set-up and then yanked them out.

Sadly, I don’t have anything able to test up to 180amperes, so I wasn’t able to perform the starter current draw test. Here’s the information I DO have, though.

Starter, Key Switch, and Ignition relays check out
Starter Relay Test and Starter Current Draw Test are on 5-11. Current draw should be between 140-180amperes.

Starter Test 1 5-4
-Battery passes load test--Good
-System is NOT operational--Not Good
-Audible clicking noise comes from starter solenoid area--Not Good

Starter Test 2: Solenoid Clicks 5-5
-Voltage drop between battery and relay terminal is zero--Good
-Voltage drop between battery positive and starter motor relay while cranking is 4.89VDC--Not Good
-Voltage drop between battery positive and starter battery terminal while cranking is .06VDC--Good

Solution: Repair or replace solenoid (contacts)


Since I was there, I felt I may as well do the next test, too.

Starter Test 3: Relay clicks 5-5
-12V present at solenoid relay terminal on starter when starter button pressed--Good
-Did NOT test to see if motor would turn if jumped (don’t trust myself)--For the best

Solution: (a) Replace solenoid or (b) Test starter motor for opens, shorts, or grounds. Replace or repair starter motor.


Starter Activation Circuits 5-8 and 5-9
Now, I’m not entirely sure where to poke at in order to test the voltage drop for the starter circuit. I know the different parts, but I don’t know where I need to put my DMM, specifically, for each part of the circuit.


Voltage Regulator Bleed Test 7-23
-Trouble light did not come at each pin to voltage regulator--Good
-11.43VDC present at each pin to voltage regulator
-0-32VAC (oscillating) present at each pin to voltage regulator

Milliampere Draw Test 7-23
-Maximum reading should be either 1mA or 1.6mA (can’t remember which)
-1.51mA present--Maybe good, maybe bad

Fuse Pulled--------Reading
Diode---------------Fluctuated, leveled at 1.45mA
Battery--------------0mA
ECM----------------0.86mA
Lights--------------No Change
Key Switch-------1.08mA
Ignition------------No Change
Accessory---------No Change
Brake/Horn-------No Change
Fan-----------------1.29mA
Spare---------------No Change
***
Here's what I found:

Milliampre Draw Test 7-25
-MAXIMUM reading be 1.6mA
-Reading is 1.51mA

Starter Current Draw Test 5-11
-Typical starter current draw should be between 140-180 amperes
-Starter current draw (at best) is 120 amperes with the starter button held down and only declines with each attempt thereafter


Here's what I can't do (open to correction) since the bike won't start:
Total Current Draw Test 7-25
Current and Voltage Output Test 7-26
Voltage Output Test 7-26
AC Output Check 7-27

Here's what I found:
Stator Check 7-26
-NO continuity across ALL stator sockets and ground--Good
-Resistance across stator sockets (1-2, 2-3, 3-1) should be between 0.1 - 0.3 ohms.
-Resistance across stator sockets (1-2, 2-3, 3-1) increases/decreases between 0.0 ohms and 0.4 ohms--Not good..?
-Resistance remains at 0.0 ohms if stator connector [46] is shaking--Not good..?
From the manual- "If resistance is lower, the stator is damaged and must be replaced."


As far as a bench test is concerned- I have no idea how to do one. I called a few auto part stores, a Harley shop, and a bike shop and was told the voltage regulator had to be in the bike for them to test it, they wouldn't do it, or they only test cars.
***
I'm uploading a couple videos of the bike trying to start.

Had the cables hooked up two different ways:
One
Both cables disconnected from bike battery terminals
Positive terminal on truck to positive cable on bike
Negative terminal on truck to ground on bike

Two
Positive cable disconnected from bike battery terminal
Negative cable connected to bike battery terminal
Positive terminal on truck to positive cable on bike
Negative terminal on truck to ground on bike

I felt around for heat on the VR, starter, harness, etc. I think (not 100% on this) there was an increase in temperature on the voltage regulator and the motor terminal of the starter. I also noticed a bit of corrosion on the underside of the nut for the motor terminal.
Here's a link to the first video: http://www.youtube.com/watch?v=i9sgxxrbjes
***
Went over the grounds and cleaned them off, again. Apparently, this did the trick because it started right up without a single clicking noise. The problem, though, is it wouldn't idle at all.

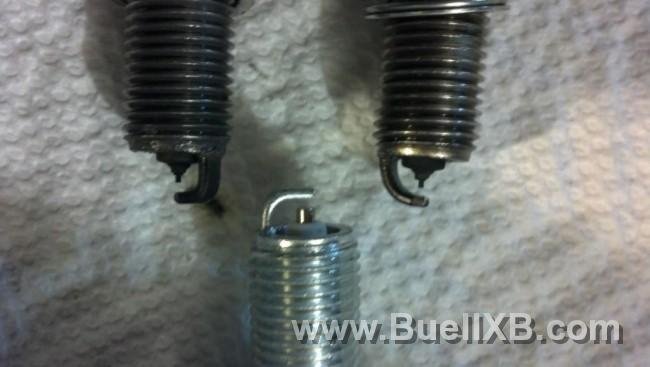
Pulled the plugs and they were covered in black wet stuff (assuming oil/gas). Put in new ones from the Harley dealership and it idled perfectly for 3-5 seconds...and died.

I'm thinking the electrical problem of the battery being drained ridiculously quickly may or may not be gone and the current issue is the plugs becoming fouled so quickly.

I'll be pulling the plugs currently in the bike to check them out. I just wanted to get this information out here as soon as possible.

Here's a picture of the old plugs vs. the new one:
17481_20131022164630_L.jpg
 
I didn't ride her around last night because it was getting dark and didn't know want to risk it. It appears it's settled down A LOT-

Rode around the block and it died on me a couple times. Once I let off the throttle it was rough (chugging back and forth) and took some time to realize I had pulled back on the throttle again.

Decided to keep riding since it progressively smoothed out after riding a few miles. After five or so miles it was acting as though nothing was wrong! It idled, it responded to changes in throttle instantly, and there was nothing that felt out of place!

That burning smell was present, but I may have figured that problem out. I noticed a pool of fork oil on the wheel after I parked it. The smell was definitely there once I put the sidestand down, but went away after a few minutes. I noticed fork oil on the right side (throttle side) of the engine and the front wheel fairing.

Here's where I'm at now:
1) It runs perfectly after being warmed up- I'm waiting for the engine to cool down to see if things will be different.

2) What does burning fork oil smell like? I'm guessing it smells bad.

3) There still seems to be a bit of play in the throttle cable. Could this be linked to an idle issue? Or should I disregard this?
***
Forgot to mention that I felt the voltage regulator and along some of the wiring. The VR felt barely warm after a 30-40 minute ride and I couldn't feel any warm/hot spots along any of the wiring.
***
Smell
That smell only comes around when there's fork oil on the engine. If the bike sits still and idles, there's no smell.

Throttle Cable
Now, I know there's supposed to be some play in the throttle cable, but I just felt like there was some "extra" play in the throttle cable. More than what was there before. I'm probably just nitpicking at everything after all that's been going on with this bike.

Charging
I plan on testing the charging system as soon as I'm able to. At this moment I'm just making a checklist of everything I need to do, once I get some free time.

Battery
Now, I put in a different (old) battery into the bike. The old battery is what got the bike running, and is what I currently have in it. I tried starting with the new (HD) battery in, but all that came of it was that machine gun click. I'm thinking the battery isn't as good as it was when Harley load tested it. For now, though, I'm keeping the old battery in there.

Mileage
I'm slowly putting miles on it, but the weather isn't allowing me to put on as many as I would like! I rode to my university yesterday and clocked about 30 miles. Thirteen to 15 miles in to the trip is when everything started to smooth out.

Lights
I read some people have done a modification where both headlights are turned on when the high-beam is turned on. With this modification, the low-beam gets moved to the accessories circuit/accessories fuse. When I turn on the high-beam, both headlights come on, so I'm guessing this is what was done to the wiring harness before I got it.
 
Back
Top