repair fairing stay

Buellxb Forum

Help Support Buellxb Forum:

Ok made a call, i can give ya the info if ya get ahold of some magnisum rod (welding supply) a friend that owns a shop has an awesome TIG welder in vista said hed do it.
 
what size diameter rod? may have to get it special order, not usually something stocked on the shelf I believe
 
Size im not sure of. Maybe wait to see the missing piece and use any gap as a reference. Im sure this guy can work with a lot. Wouldnt think super small
 
would this be a good idea to follow... after cleaning the area, preheat the casting to at least 275 degrees and use AZ101 filler rod and set your TIG welder to the same settings that you would for aluminum welding.

I blasted mine with Aluminium Oxide to clean it(do not blast with sand/plastic/anything but Aluminium Oxide). I did preheat it as we have a giant oven at work, I don't recall what I preheated it to.
 
aahhhhhhhhhhhhhhh, no...that stuff is expensive as hell and so far special order, not to mention the minimum weight one has to order, oh my...how about good old fashion stick welding, looks like I can get some stick electrodes at a 1 lb. minimum for just over 4 bucks from Airgas if they have it in stock, size diameter and which # stick to get...1, 5, 10, or 60?
 
hmmm... IDK. The reason I'd used AZ91 was because we had it at work and it was free... I hadn't priced it. Might check a few local welding shops that specialize in aircraft components and see if they'd give up a rod...
 
Robin, you work at an air port. Ask around? Also it was said doable but not strong was gluing it with aluminium rob. And that my friend has.
 
I hear ya crash, most if not all places here out source the welding, aviation welding is a specialty and critical requiring certs, not a ma and pa type thing in my business. magnesium parts in aviation are mainly gearboxes, some are control surfaces like elevator skins and turbine engine compressor cases.

think the cheapest way to go at the moment might be to try the aluminum rob, my original thought was to make a doubler from aluminum and solid rivet the dang thing together, clean it up, prep and paint...what I'm reduced to on a tight budget with most materials readily on hand.
 
Like i said we can experiment on mine see what happens. I can drop my stay off on thursday and see what the aluminum does to it.
 
magnesium reacts to aluminum harshly, dunno the make up of the stay, but it's probably an alloy mix and not pure magnesium, try what firefighter used on his rather than aluminum, that's if your welder has it on hand, I'd like to see the weld, will it be done by Friday, maybe I can meet up with you at the shop and check it out then?
 
wolfo hooked me up with the missing piece of the puzzle:D has some extra material (length wise) to work with, need to clean up the break on the stay, measure, cut to fit, and weld... afterwards prep for paint.

crash...how did the weld come out on yours?
 
Here are the two pieces put together for fitting, multiple measurements taken to ensure proper fit...so what do you think? and have some parent material left over, almost 1/2"x1/4" piece and some from cleaning up the original break line on the stay for filling the gap in.

10624_20121103114437_L.jpg


10624_20121103114500_L.jpg


thanks again wolfo[cool]
 
I ran into bike issues of my own friday left me on the side of the road twice i was dealing with that so i didnt get to the shop in time to see how the welding goes. Closed this weekend so ill have an idea monday hopefully.
 
See my latest Post but basically the battery in a weird way. The internals of the battery had an issue and completely dropped all voltage and apms. Replaced no issues. Tested today, 11cca thats not enough to run anything.. New thread idea
 
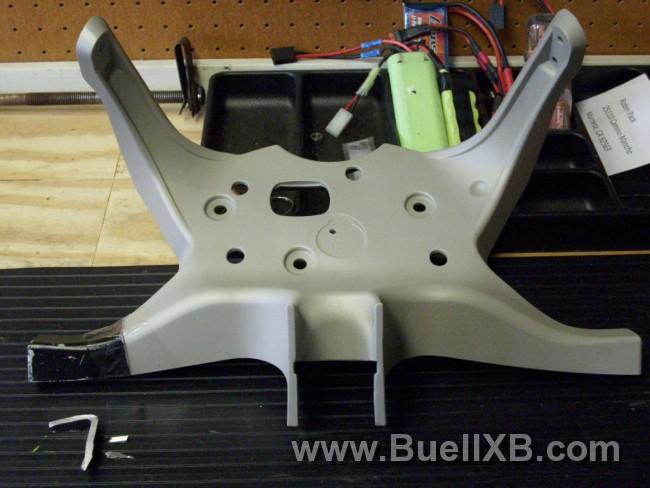
here's the finish product, no welding involved...

10624_20121124092257_L.jpg


10624_20121124092235_L.jpg


10624_20121124092212_L.jpg


materials used for the repair:

.032" sheetmetal...x2 pieces, roughly 1"x 1/2"
#6 coarse thread screws...x8 pieces
3M Hysol...two part epoxy, aviation version of JB Weld so to speak
Krylon primer...Gray
Krylon Appliance epoxy finish...Black

began by drilling .040" holes on the stay and left piece, used a larger drill bit to deburr everything, removed paint from repair area on both pieces, used small pop rivets to line up the aluminum pieces to the stay, one piece at a time applied a thin coat of Hysol and onto the edges of both the stay and left piece and put them together, removed rivets one at a time and replaced with screws, which protrude through...after 24 hours of setting up, used a dremil with a cutting wheel and cut the ends of the screws that protruded through the stay flush with the surface, filled any imperfections with Hysol, let dry another 24 hours and sanded top and bottom surfaces of the stay, primed and painted...installed well nuts where needed...so she's ready to go now
 
Back
Top